웹팩 기본 사용 방법
웹팩 기본 사용 방법에 대해서 다룬다.
Basic 🔗
entry 파일을 시작으로 하여 해당 파일에 import로 포함된 모든 파일을 묶어 ouput 파일을 생성한다.
// webpack.config.js

const path = require('path');

module.exports = {
  // index.js 파일을 시작으로 함
  entry: './src/index.js',
  // dist/bundle.js 파일을 생성
  output: {
    filename: 'bundle.js',
    path: path.resolve(__dirname, 'dist'),
  },
};
build시 mode를 development로 하면 build된 bundle.js의 주석을 보고 어떤 모듈이 포함되어 있는지를 확인할 수 있다.
아래 명령어를 입력해서 build하면
npx webpack --config webpack.config.js --mode development
다음과 같이 bundle.js에 어떤 게 포함되어 있는지 주석을 통해 알 수 있다.
// bundle.js

/***/ "./node_modules/lodash/lodash.js":
/*!***************************************!*<br>  !*** ./node_modules/lodash/lodash.js ***!
  \***************************************/
/***/ (function(module, exports, __webpack_require__) {

// ...

/***/ "./src/index.js":
/*!**********************!*<br>  !*** ./src/index.js ***!
  \**********************/
/***/ ((__unused_webpack_module, __webpack_exports__, __webpack_require__) => {
https://github.com/socratone/webpack-example/tree/main/basic
CSS Loader 🔗
css-loader와 style-loader를 이용하면 entry에서 import로 불러온 .css 파일의 내용을 bundle.js에 포함시키고index.html에서 bundle.js를 불러올 때 이 파일의 내용이 head의 style로 들어가게 된다.
// webpack.config.js

const path = require('path');

module.exports = {
  entry: './src/index.js',
  output: {
    filename: 'bundle.js',
    path: path.resolve(__dirname, 'dist'),
  },
  module: {
    rules: [
      {
        test: /\.css$/,
        // 오른쪽에서부터 적용
        // css-loader는 css 파일을 불러오고 style-loader는 html head에 style로 넣는다.
        use: ['style-loader', 'css-loader'],
      },
    ],
  },
};
https://github.com/socratone/webpack-example/tree/main/css-loader
SASS Loader 🔗
sass를 쓴다면 sass-loader를 앞에 넣어주면 된다.rules에 두 가지를 넣어서 .css와 .scss를 불러올 수 있다.
// webpack.config.js

const path = require('path');

module.exports = {
  entry: './src/index.js',
  output: {
    filename: 'bundle.js',
    path: path.resolve(__dirname, 'dist'),
  },
  module: {
    rules: [
      {
        test: /\.css$/,
        use: ['style-loader', 'css-loader'],
      },
      {
        test: /\.scss$/,
        use: ['style-loader', 'css-loader', 'sass-loader'],
      },
    ],
  },
};
https://github.com/socratone/webpack-example/tree/main/sass-loader
Image Loader 🔗
import된 이미지 파일 각각을 /dist 에 export한다.
// webpack.config.js

const path = require('path');

module.exports = {
  entry: './src/index.js',
  output: {
    filename: 'bundle.js',
    path: path.resolve(__dirname, 'dist'),
    // /dist/images 폴더에 두고 싶다면
    assetModuleFilename: 'images/[hash][ext]',
    // /dist에서 사용하지 않는 파일 삭제
    clean: true,
  },
  module: {
    rules: [
      {
        test: /\.(png|jpg)$/,
        type: 'asset/resource',
      },
    ],
  },
};
https://github.com/socratone/webpack-example/tree/main/image-loader
Font Loader 🔗
import된 폰트 파일 각각을 /dist 에 export한다.
// index.js

import './index.css';
import './assets/fonts/Redressed-Regular.ttf';
// webpack.config.js

const path = require('path');

module.exports = {
  entry: './src/index.js',
  output: {
    filename: 'bundle.js',
    path: path.resolve(__dirname, 'dist'),
    clean: true,
  },
  module: {
    rules: [
      {
        test: /\.css$/,
        use: ['style-loader', 'css-loader'],
      },
      {
        test: /\.(ttf|woff)$/,
        type: 'asset/resource',
      },
    ],
  },
};
https://github.com/socratone/webpack-example/tree/main/font-loader
Multiple Bundle 🔗
여러 bundle.js를 생성하고 싶다면 아래와 같이 설정한다.
// webpack.config.js

const path = require('path');

module.exports = {
  entry: {
    first: './src/first.js',
    second: './src/second.js',
  },
  output: {
    filename: '[name].bundle.js', // => first.bundle.js, second.bundle.js
    path: path.resolve(__dirname, 'dist'),
  },
};
https://github.com/socratone/webpack-example/tree/main/multiple-bundle
HTML Plugin 🔗
dist에 추가적으로 html 파일을 만들어주는 플러그인
// webpack.config.js

const path = require('path');
const HtmlWebpackPlugin = require('html-webpack-plugin');

module.exports = {
  entry: {
    first: './src/first.js',
    second: './src/second.js',
  },
  output: {
    filename: '[name].bundle.js', // => first.bundle.js, second.bundle.js
    path: path.resolve(__dirname, 'dist'),
    clean: true,
  },
  plugins: [
    // dist에 추가적으로 html 파일을 만들어주는 플러그인
    new HtmlWebpackPlugin({
      template: path.resolve(__dirname, 'src/first.html'), // html을 생성할 때 재료로 삼을 .html 파일 경로
      chunks: ['first'], // entry의 'first'에 해당하는 .js 파일을 bundle로 사용
      inject: 'body', // 'body'를 넣으면 모든 javascript resource는 body의 제일 끝에 위치하게 된다.
      filename: 'first.html', // 'first.html'라는 이름으로 파일 생성
    }),
    new HtmlWebpackPlugin({
      template: path.resolve(__dirname, 'src/second.html'),
      chunks: ['second'],
      inject: 'body',
      filename: 'second.html',
    }),
  ],
};
https://github.com/socratone/webpack-example/tree/main/html-plugin
Dev Server 🔗
Dev Server를 띄워서 변경된 내용이 browser에 바로 반영되도록 한다.
// webpack.config.js

const path = require('path');
const HtmlWebpackPlugin = require('html-webpack-plugin');

module.exports = {
  entry: {
    index: './src/index.js',
    second: './src/second.js',
  },
  output: {
    filename: '[name].bundle.js', // => index.bundle.js, second.bundle.js
    path: path.resolve(__dirname, 'dist'),
    clean: true,
  },
  devServer: {
    static: path.resolve(__dirname, 'dist'), // devServer가 바라보는 경로
    port: 3000,
  },
  plugins: [
    // dist에 추가적으로 html 파일을 만들어주는 플러그인
    new HtmlWebpackPlugin({
      template: path.resolve(__dirname, 'src/index.html'), // html을 생성할 때 재료로 삼을 .html 파일 경로
      chunks: ['index'], // entry의 'index'에 해당하는 .js 파일을 bundle로 사용
      inject: 'body', // 'body'를 넣으면 모든 javascript resource는 body의 제일 끝에 위치하게 된다.
      filename: 'index.html', // 'index.html'라는 이름으로 파일 생성
    }),
    new HtmlWebpackPlugin({
      template: path.resolve(__dirname, 'src/second.html'),
      chunks: ['second'],
      inject: 'body',
      filename: 'second.html',
    }),
  ],
};
https://github.com/socratone/webpack-example/tree/main/dev-server
Copy Plugin 🔗
dist에 파일을 복사해 넣어주는 플러그인
// webpack.config.js

const path = require('path');
const HtmlWebpackPlugin = require('html-webpack-plugin');
const CopyPlugin = require('copy-webpack-plugin');

module.exports = {
  entry: './src/index.js',
  output: {
    filename: 'bundle.js',
    path: path.resolve(__dirname, 'dist'),
    clean: true,
  },
  plugins: [
    // dist에 추가적으로 html 파일을 만들어주는 플러그인
    new HtmlWebpackPlugin({
      template: path.resolve(__dirname, 'src/index.html'), // html을 생성할 때 재료로 삼을 .html 파일 경로
      inject: 'body', // 'body'를 넣으면 모든 javascript resource는 body의 제일 끝에 위치하게 된다.
      filename: 'index.html', // 'index.html'라는 이름으로 파일 생성
    }),
    new CopyPlugin({
      patterns: [
        {
          from: path.resolve(__dirname, 'src/assets/images/*'), // /images 이하의 모든 파일 복사
          to: path.resolve(__dirname, 'dist'),
          context: 'src', // from 경로에서 src를 지워서 dist 폴더에 추가 => dist/assets/images/*
        },
      ],
    }),
  ],
};
https://github.com/socratone/webpack-example/tree/main/copy-plugin
Optimization 🔗
여러 페이지에 중복으로 사용하는 library는 caching 되도록 별도의 .js 파일로 뺄 수 있다.
아래와 같이 optimization 속성을 넣으면 알아서 해준다.
// webpack.config.js

const path = require('path');
const HtmlWebpackPlugin = require('html-webpack-plugin');
// const { BundleAnalyzerPlugin } = require('webpack-bundle-analyzer');

module.exports = {
  entry: {
    first: './src/first.js',
    second: './src/second.js',
  },
  output: {
    filename: '[name].bundle.js', // => first.bundle.js, second.bundle.js
    path: path.resolve(__dirname, 'dist'),
    clean: true,
  },
  plugins: [
    // dist에 추가적으로 html 파일을 만들어주는 플러그인
    new HtmlWebpackPlugin({
      template: path.resolve(__dirname, 'src/first.html'), // html을 생성할 때 재료로 삼을 .html 파일 경로
      chunks: ['first'], // entry의 'first'에 해당하는 .js 파일을 bundle로 사용
      inject: 'body', // 'body'를 넣으면 모든 javascript resource는 body의 제일 끝에 위치하게 된다.
      filename: 'first.html', // 'first.html'라는 이름으로 파일 생성
    }),
    new HtmlWebpackPlugin({
      template: path.resolve(__dirname, 'src/second.html'),
      chunks: ['second'],
      inject: 'body',
      filename: 'second.html',
    }),
    // new BundleAnalyzerPlugin({}),
  ],
  optimization: {
    splitChunks: {
      chunks: 'all',
    },
  },
};
주석 처리한 BundleAnalyzerPlugin을 활성화 시키고 build하면 시각적으로 bundle 사이즈를 확인할 수 있다.
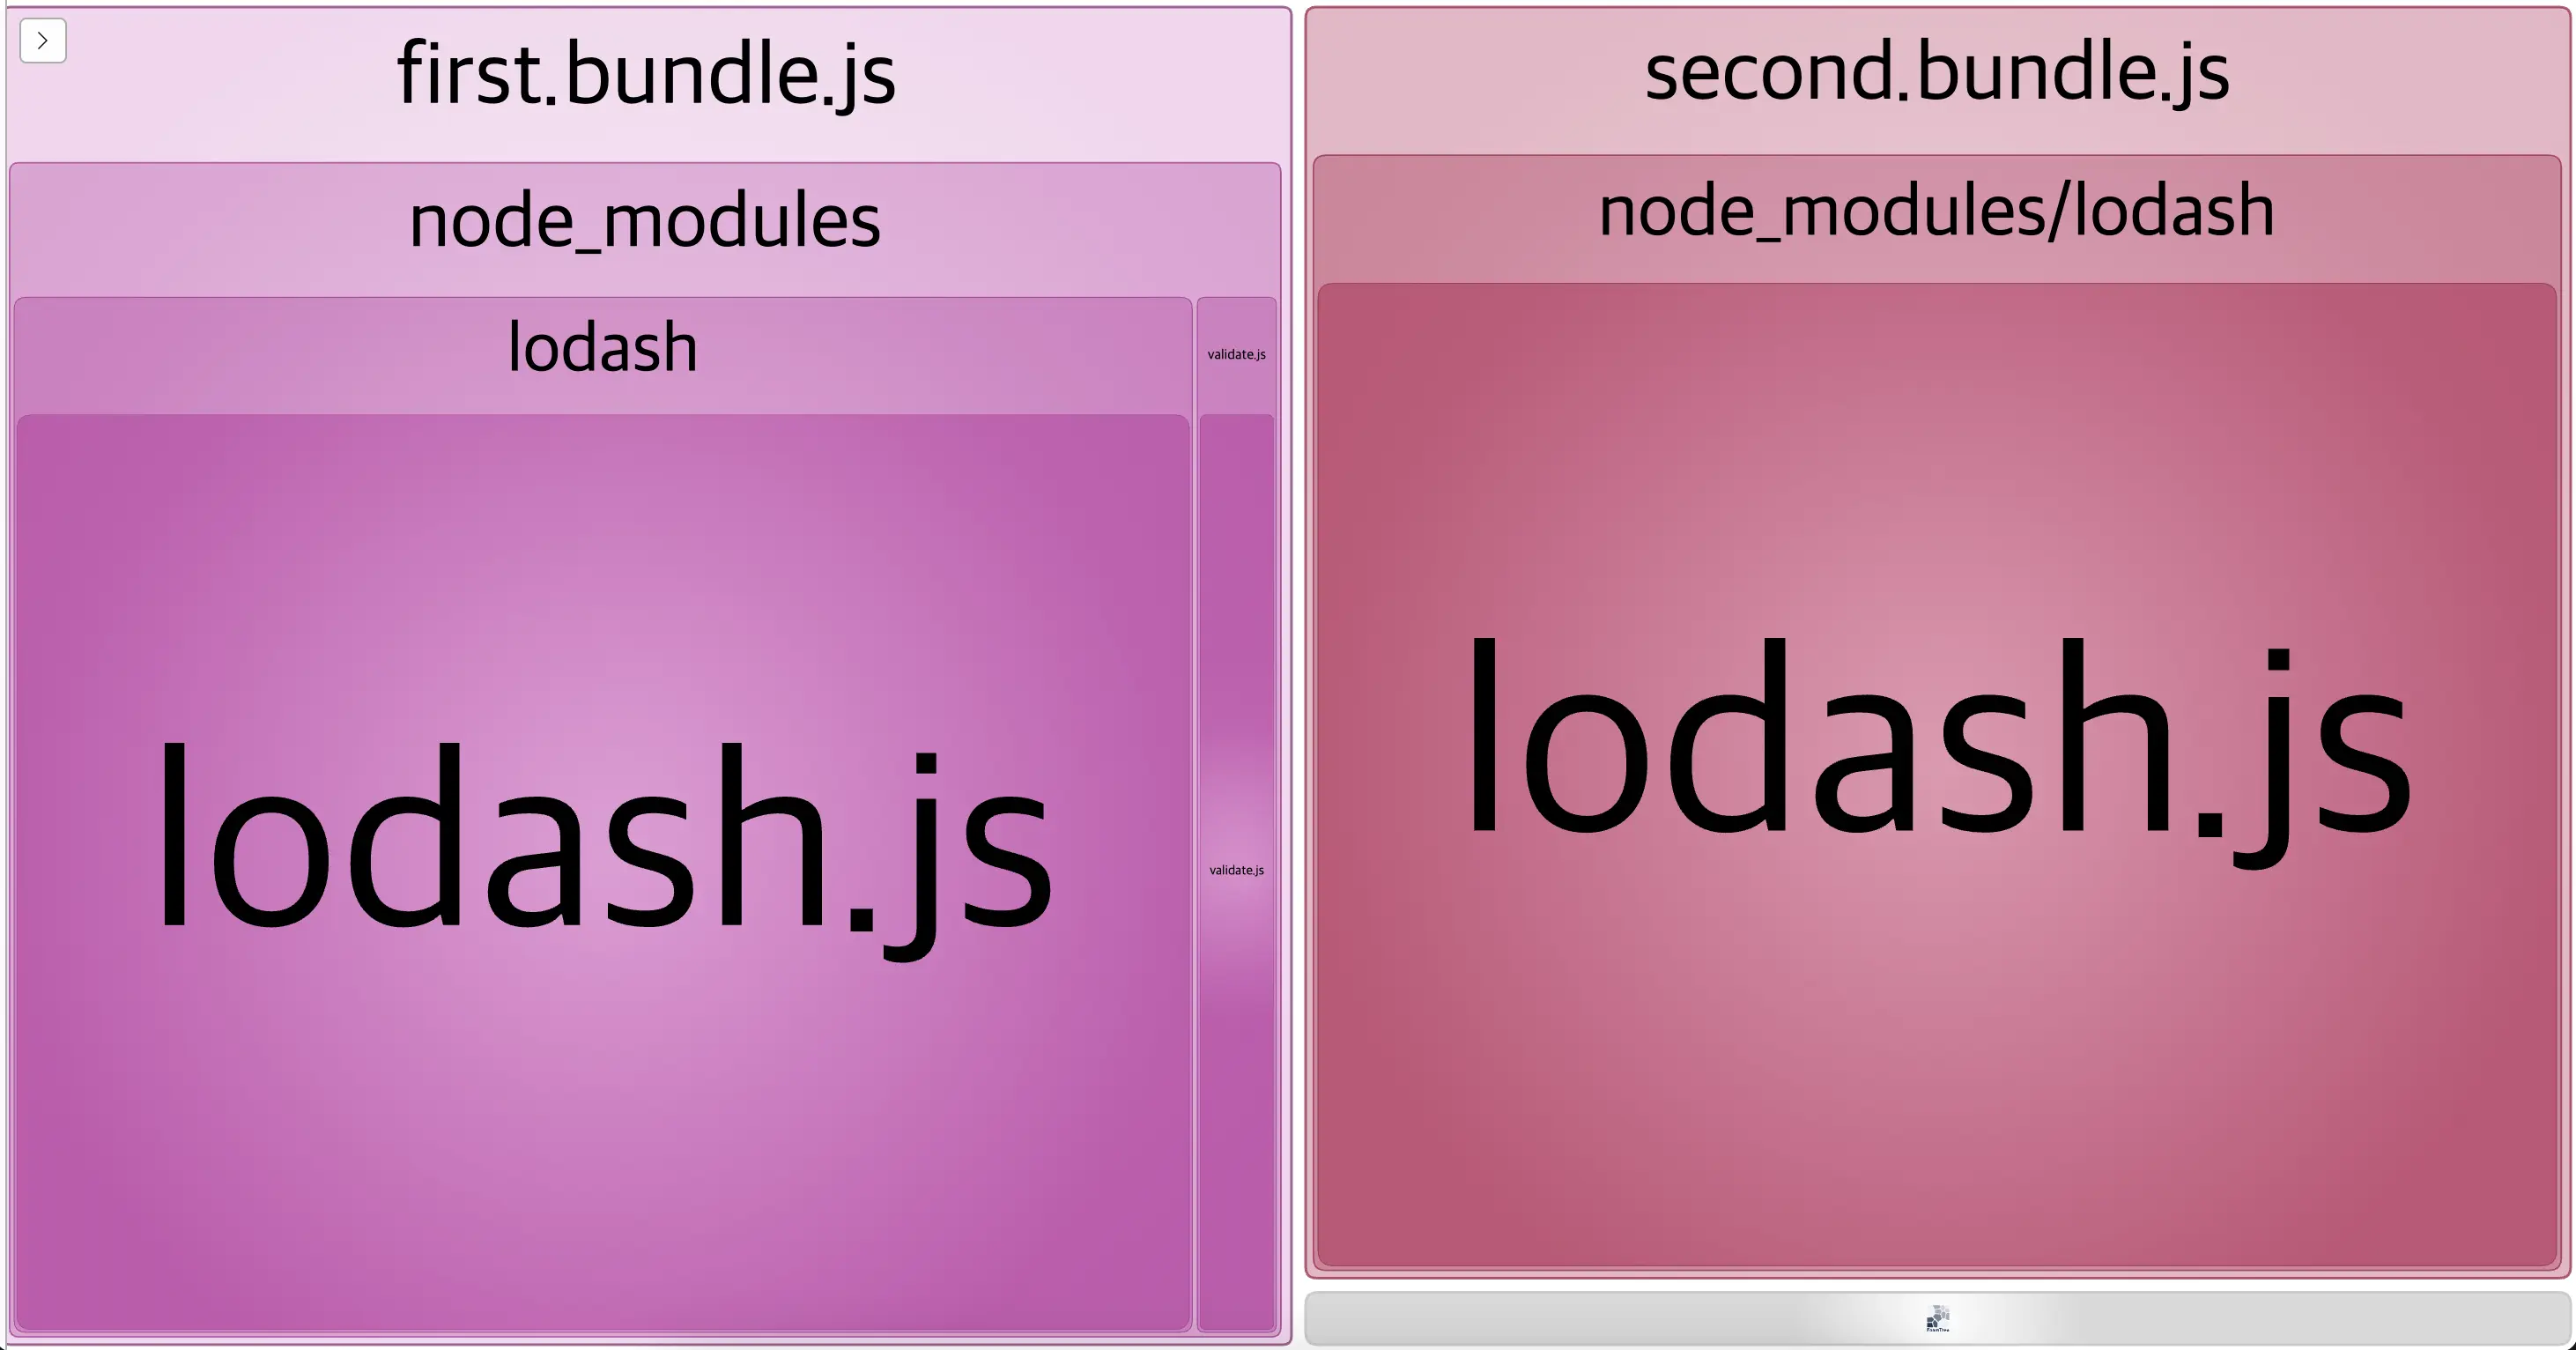
Optimization을 하지 않았을 때 🔗
first.bundle.js와 second.bundle.js 각각에 lodash 라이브러리 코드가 포함된다.
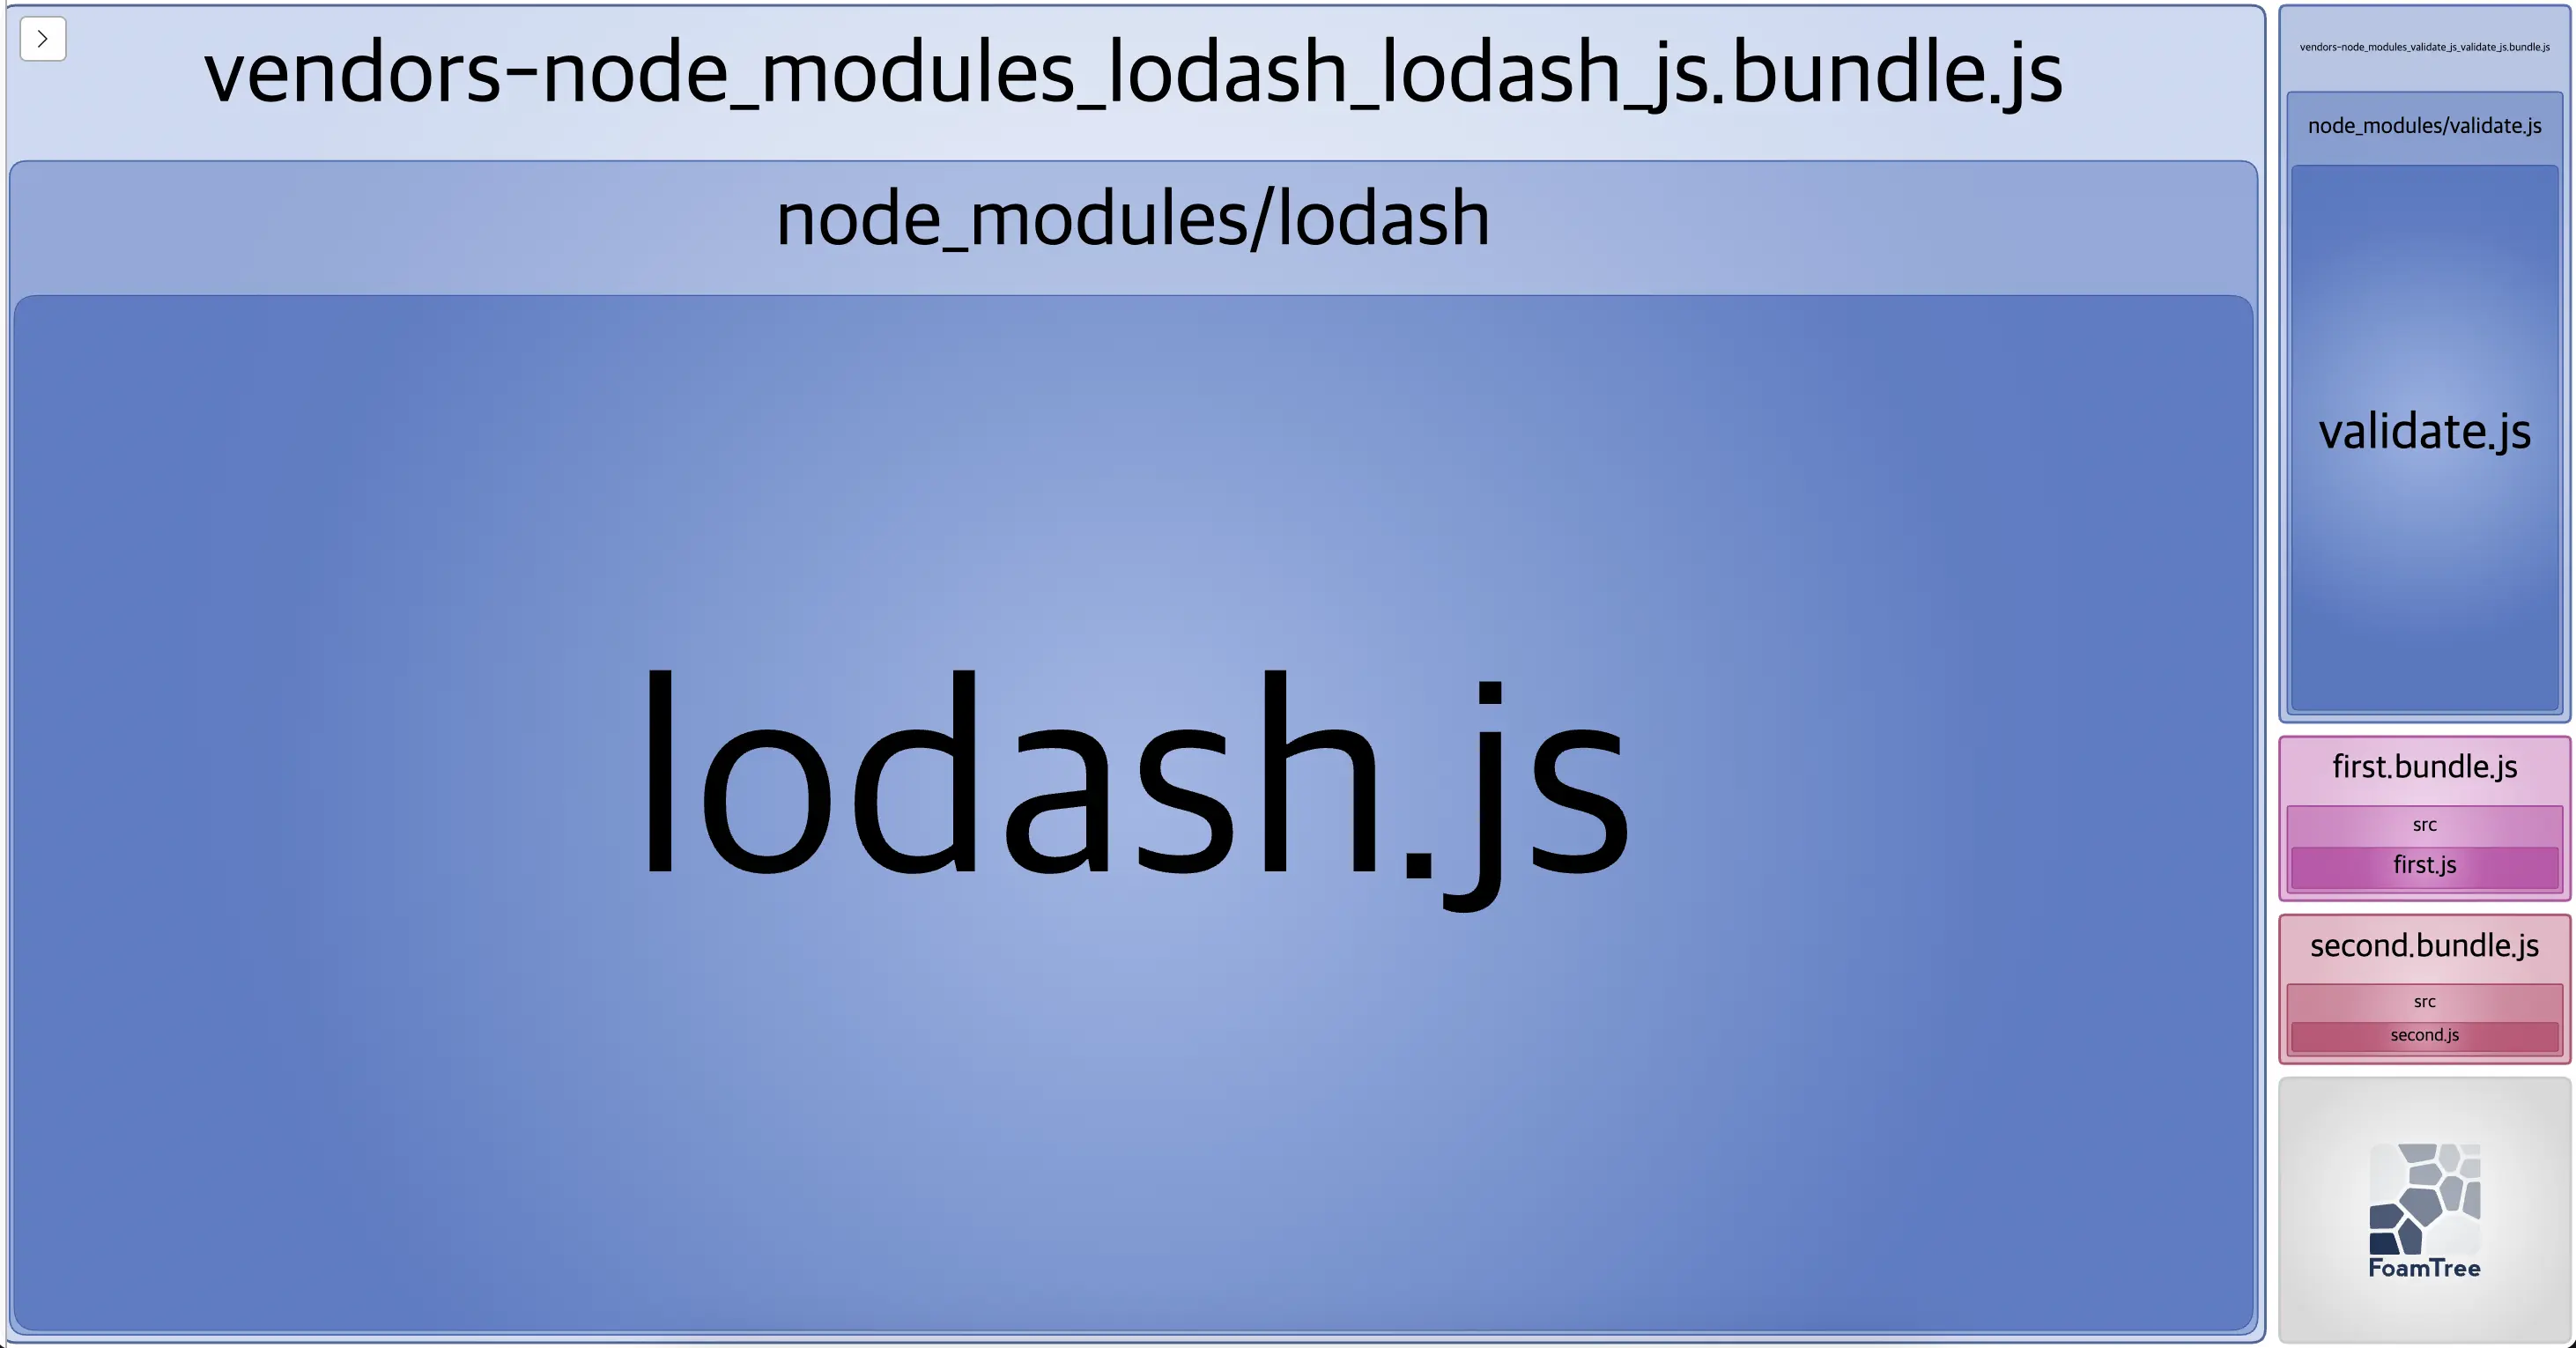
Optimization을 했을 때 🔗
first.bundle.js, second.bundle.js와 분리된 vendors-node_modules_lodash_lodash_js.bundle.js가 따로 생성된다.
https://github.com/socratone/webpack-example/tree/main/optimization
Dynamic Import 🔗
dynamic import를 쓰면 해당 chunk는 bundle.js에 포함 되지 않고 분리되며 import 요청시에 불러온다.
// index.js

const root = document.getElementById('root');
const button = document.createElement('button');
button.textContent = 'Click';
button.addEventListener('click', () => {
  // 클릭할 때 chunk를 받아와서 코드를 실행한다.
  import('./components/dialog').then((module) => {
    module.showDialog();
  });
});
root.append(button);
아래와 같은 구조로 build 된다.
- dist
- bundle.js
- src_components_dialog_js.bundle.js
// webpack.config.js

const path = require('path');

module.exports = {
  entry: './src/index.js',
  output: {
    filename: 'bundle.js',
    path: path.resolve(__dirname, 'dist'),
  },
  module: {
    rules: [
      {
        test: /\.css$/,
        use: ['style-loader', 'css-loader'],
      },
    ],
  },
};
https://github.com/socratone/webpack-example/tree/main/dynamic-import